Wednesday, March 6, 2013

Vertical Planting Tower

I have been meaning to do a nice shelving unit to house pots for veggies and herbs, been deliberating on the design, where to put it and also to materials to use. Shall i buy the building material, shall I recycle, shall I hunt down in nearby construction sites....too much thinking and not enough doing...that is the trouble with procrastinating over thinkers.

So after a jolly get together on Saturday morning on 23rd of January with some online gardening friends, i was asked point blank about a vertical planting tower. I was stumped to say the least. I realised I was thinking too much and not just doing anything.

The very next day, I took out my cordless drill and got to it. Keeping it sweet and simple for anyone to follow. I have seen many examples online about vertical planter boxes and below is the culmination of my design.

It took me one hour to get this installed and ready to plant.

Items needed:
2"x2" post about 5 to 6 feet tall. As tall as you can reach.
22 plastic pots - recycled
22 good strong screws. best to get the ones that do not rust.
1 "good" cordless screwdriver and drill set. (there are many cheap one in the market but a good one does the job better with less effort).
1 big clay pot about 1 1/2 feet wide, the wider the better.
4 bricks (new or recyled)
1 bucket of very course gravel (as filler and weight)

Method. 
Before we start, a note on timber selection for the post. I have chosen a nice solid and heavy timber from the lumber yard. it was cheap and hardy. in our tropical climate having a heavy hardwood ensure the posts will last longer and will be effective in fighting against decay, rot and insect attacks.

so now we begin, firstly...and most importantly...YOU must decide how far the pot have to sit from each other. Decide on the height separation. This is important. You must know what you want to plant and how tall they will be. Pruning will help keep the height but there has to be a minimum and a maximum height. I have chosen 8 inches for this prototype. This will allow me to see if I need to modify it in future towers. I had decided to use this configuration more because of the overlapping nature of the pots. I wanted a plush and flush tower. Possibly a nice herb and veggie christmas tree....

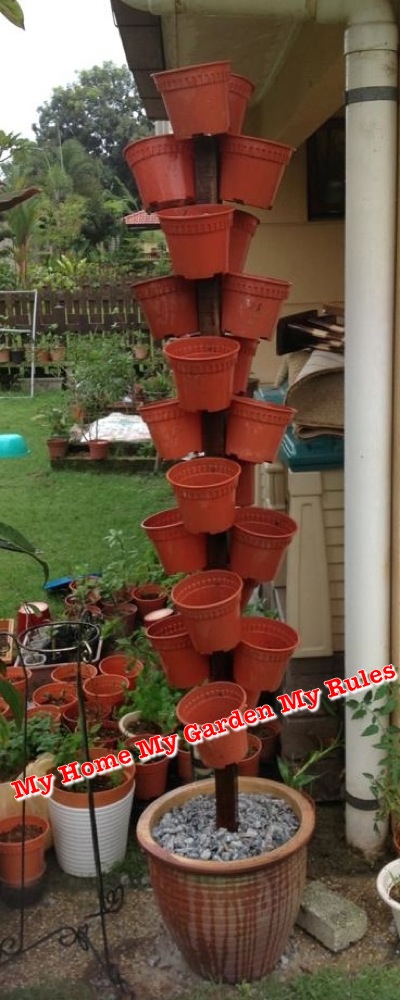
Each level has 2 pots, 1 pot opposite each other. Staggering the height of the second level and the direction on the post adds some dimension to the planting tower and space for the plant to grow. So the next level is on the other 2 face, again opposite each other, and then so on and so forth. Simple and neat. Make sure you leave at least 2 feet of length on the post to secure it inside the base pot.

After deciding where the pots will be, using a pen and a measuring tape to keep the distance identical, mark the spots where the screws will be. Use the drill to make guide holes for the screws. the holes should be smaller that the screw's diameter. Pre-drilling also helps to screw in easily and avoids the screws from cracking the post.

So the holes are drilled, and you are ready to attach the pots. I would recommend that you secure the post to the base pot first. It will allow for easier work in attaching the pots. This is how I did it and it is so secure. Firstly, Place the base pot at the final location where you want to place this vertical planter tower because once you fill it up with the rest of the stuff and the post, it will be difficult to cart around.
Place the post in the middle of a pot.
Place the bricks on the 4 flat sides of the post. I used a whole brick on each side for more surface area. The brick is then wedged against the side of the pot. move it around till you find a solid foot hold for the post. The post should not be able to move around. Now fill the pot with the course gravel, ensuring the gravel gets into the little nooks and space between the bricks. The gravel has 2 purpose, (1) is to ensure the bricks do not move while landing support to keep the post firm, and (2) the weight of the gravel will provide a solid base and helps avoid the whole structure from tipping over in strong winds. Note: the pot needs to have a wide base for stability.

Now that the post is secure and standing, make small hole in the side of the plastic pot about 1/2 inch to 1 inch from the rim of the pot. This will be the hole for the screw. Insert the screw partially so that it doesn't run away and it helps you to find the pre-drilled guide holes. Gently screw in and move on to the next till all the pots are attached.

There you go all done.

Now you will notice that the following picture, they are double potted. Well, the attached pots are actually pot holders. In this way i can actually repot or change plants whenever necessary. i do not have to detach the pot from the post. I can move the pots around should they need more shade or even take them down to go into rehab from too much sun or water. It allows a huge amount of flexibility.

So have a go.

Happy Gardening and DIY.


Modification of a small compost bin

In the search for the perfect compost bin for a small garden, I have searched the web. There are many examples to choose from. But most often they are either too expensive or unsightly in a manicured garden. I needed something unassuming but yet cost effective. It had to be big enough to accommodate our daily organic kitchen refuse and also the garden wastes.

As always thinking too much and doing nothing, is a sign of a great procrastinator. My problem is I want it perfect before I do anything about it. I want to do it right the first time or not at all. So searching thru and seeing the many examples, I chanced upon designs with an opening at the bottom.

Then it hit me like a ton of bricks, why was I wasting so much time trying to create a new garden composter bin when I could modify what I already have. Moreover the vegetation and kitchen waste has been sitting in this composter bin for more than 6 months. It was ripe for harvesting, but I could not get at it as it was on the bottom. So why not make an opening like what I had seen in the examples on the web.

So here it is. This composter bin is actually a clothes or laundry hamper that I have recycled into a Garden composter bin. It already had the required holes for aeration. Just dump in the veggie and garden waste and let it decompose. Ensuring that you have the required mix of green and brown matter for the nitrogen and carbon balance, the recommended ratio is 50/50 balance, These would be no smell and no fuss.

So using some handy power tools I set out to make it happen. I used a Bosch Multitool and a cordless drill. 

I marked out the line  where the hole was supposed to be and used the semi round blade of the multitool to cut the hole. It was perfect for the job. 
Next using the cordless drill, I bored some holes to attach the plastic cable zip ties. This will serve as the hinges to the opening. You could get metal hinges and rivet it to the plastic, but since this was already old I didn't bother. 


Now the compost harvesting hole is ready to use. Harvested a nice basin of compost and sealed the bin with a couple of zip ties for another day. Should I need to harvest more, I just cut off the zip ties, harvest and close it back again. Simple. 

All in all, it took me about 30 mins to do the whole thing. You can do this to any one of your composting bins. If the bins are bigger than mine above, then you may have to make openings on either side or on all for side if the bins if it is really large.

Composting...A better way to recycle.

Happy Gardening and DIY.


My favourite FB group chat about gardening. https://www.facebook.com/groups/ourhome.mhmgmr/


Friday, November 23, 2012

Vermicomposting - starting small in a planter box


So you want to start a worm farm for vermicomposting. You wanna go green and save some money on fertilizers. You have read all the blogs and watch all the youtube videos that are either too long and are talking about the same thing. 

So have I, and I am sure some of you have the same questions I had. Who has the best design or idea. if you are observant some designs that we have watch just doesn't cut it. They are not sure what they are doing or they have not thought their designs through.

So I had chanced upon this video that was so impressive, simple and informative.


Now came the task of making my own. If you are like me and like anything DIY, then you must have been thinking of a design that would best suit your needs and space available. I have contemplated making it the cheapest way possible and using as much recycled components as possible.

Sure, the video showed using styrofoam boxes, these you can get from your grocers and maybe even fish mongers. You just have to ask them and it is practically free. I have not the time to get seek out these people but I had already been digging for worms. I wanted to test out the application before spending on getting my stock of worms.

Now, I had dug up some worms about 10 to 12 of them from the field next to my house, and placed them in a small deep basin with soil, paper and some veggies. I forgot all about it as the worms did their job. As I opened the container it stunk to high heaven and I thought all the worms had done a harakiri. To my surprise the were FAT and happy. Cool, so now. I have to get cracking at getting them a new home. 

I still have not gotten the styrofoam boxes. I could have modified old plastic container boxes but that would take up so much more time. Time that I did not have. I was in the midst of setting up a small Aquaponics experiment (which will be in an upcoming post). I have to re-pot 30 large Ademiums. All this only on mornings of my weekends.

Then it hit me, I actually had a miniature worm bin. It was all set up and all it needed was to get the worms in. It was a planter box. 

Planter boxes have been designed to be a self watering and good drainage pots.It comes with a plastic mesh to separate moisture and soil. With slight modification it would be ideal for the purpose of vermicomposting.


Here is How I did it. Hopefully it will help you.

If you have this sort of planter box and if you are already familiar with it, you will notice that the plastic mesh at the base has some conical or square protrusions. In normal circumstances, these protrusions are normally placed facing downwards towards the base. When the soil sits in this protrusions it help to drag water up back to soil to keep it moist for the plants.

Now for vermicomposting you do not want to have the Vermicompost tea to be reabsorbed back into the system and making it too moist for the poor little guys. So just flip it over and make them point up like this picture

There is also a little islet in this planter box that allows extra water to run off when you over water it. Plug up the islet. This shall serve as a catchment to save the Vermicompost tea should there be any. This Vermicompost tea is a good source of nutrition for your plants and it can be used as a plant growth booster. Just remember to dilute it wil water. Applying Vermicompost tea without dilution may kill and overpower your poor plants and herbs.

So now comes the rest of the process similar to everyone else. Adding down shredded newspaper bedding for the worms, and putting the worms in. Back to the worms in the basin. Well they have had an extremely moist habitat, kept in a low light area and had plenty of veggies to munch on. The problem was the newspaper bedding initially put into the basin was completely soaked with vermicompost tea. It was so wet and sticky, I thought I had lost all the worms in there. To my great surprise they double in size. Nice, juicy, fat, plump compost makers. 


As I am not familiar as yet with worm species recognition, to me this are just regular garden earthworms I have all over my lawn garden compound. The kinda look like the red wrigglers that we are supposed to use for composting but I  cannot be certain until I get my hands on some proper red wrigglers stock. 

Since the worms are safe and happy, its time to put them to their new home. Spreading this wet mess of compost goodness on the shredded newspaper bedding, I found that it was a very nice size for up to "test" run on vermicomposting. This will allow me the opportunity in the next few weeks and months to observe the actions of composting using worms and also to recognize what is required for a larger scale. 

Now the final steps are to cover up the worms with some nice organic soil and have it ready for fresh kitchen veggie and fruit discards. I won't go into detail of what you can and cannot put into the vermicompost bins as it has been covered extensively in many other sites. But do note, No Dairy stuff, No oily stuff and No Meat products. Oh yes, No Garlic or Onions too. Worms hate the stuff.

I had left the worms to acclimatise into its new habitat and instead of using a plastic cover (which doesn't come with planter boxes. Should you need one you can modify a flat plastic sheet), I used sheets of folded wet newspaper to keep the climate cool. 


This is the final outcome. Add only what you think is enough for the worms to eat. Overloading the planter with too much veggie cuttings will mean that those not eaten quickly enough will actually rot, stink and attract unwanted guests like maggots and flies. When the worms multiply, and they will, you can add more stuff. Should you use more worms the breaking down of kitchen scraps will generally be faster. The main reason I believe this a vermicomposting bin of this size is better for the small gardener is because you will be able to reap the benefits of worm composting sooner than that of those larger models available on the other internet sites. It is also a very convenient size for those living in smaller homes that don't have the luxury of space.

So if you find this information to be helpful, please try it, let me have your feedback and questions. I will try my best to help you find answers. 

Happy Gardening Y'all.

Lets Chat on Facebook here: Click Link Below 


Wednesday, November 21, 2012

My First Post

The writing bug has sort of hit me. I realised I like sharing ideas and information especially to those closest to me.  I have been sharing my experiences, hints and observations while gardening my own little patch of heaven through a gardening group on Facebook. I found that many people love gardening, but somehow either do not know where to start or have some form of mild fear in doing something. I am wondering why is that so....

I am of the opinion that we should be fearless in gardening. Just do what you feel is right. Do not be afraid of making mistakes, for only with mistake do we learn better and remember not to repeat again.

You will never stop learning when it comes to gardening and more so in every faction of life. Every plant has its nuances, likes, dislikes, growing requirements, nutritional needs, water needs and so on.

Every garden is a micro-climate in itself. What works for me may or may not work for lot down the road. So testing and experimenting is by far the only way to "feel" out your plants' needs. The shade of a large tree, the wind that passes through your little plot of heaven, the subsoil water flow directions in that plot and the sunrise-sunset directions, are all contributors to how well your plant grows.

It is my wish that I shall share things, that along the way, I feel and bring important meaning to me and my life, it will not be just gardening but also tips I have learnt along the way, home repairs, cool tools, my gardening and plant experiments, especially trying to keep things organic and basically just some of life's gifts that we may have taken for granted.

So thank you for reading this and hope that we can enjoy this journey together.

Peace and Love to y'all.